
Every Excel Power Pivot Model or Power BI Desktop file needs a Calendar.
With the addition of a Calendar to your Data Model you can start to do all sorts of useful analysis such sorting the data by Fiscal month and Fiscal Year or performing calculations such as TotalYTD, Year On Year Growth, Actual v Full Year Budget etc… this list goes on.
It’s a critical element.
There are several ways to create this Calendar, but the most flexible way is to use Power Query.
This does involve a little coding – using “M” – which is the language of Power Query.
Or, you’ll be glad to hear, just some simple copy pasting!
Once you’ve taken 2 minutes to set it up you can re-use it again and again.
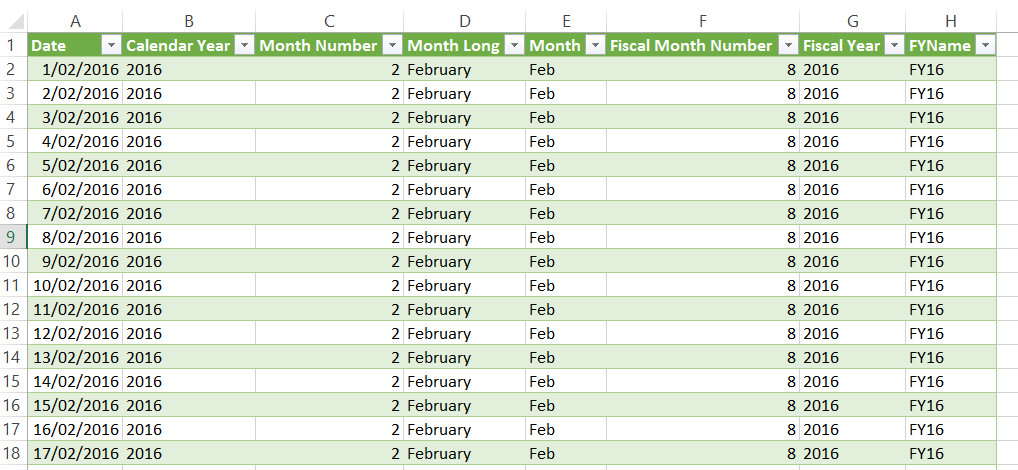
Download a pre-built calendar
If you don’t want to read all about the “how to” below, you can simply download a prebuilt Power Query Calendar (in an Excel file) here
![]()
Then you can open that Excel file, show the query pane, and then right-click on the Calendar query , choose Copy and then paste it into your project (Excel or Power BI)
You can then easily change the Fiscal Year End, Start Date and End Date in the first 3 steps of the query.
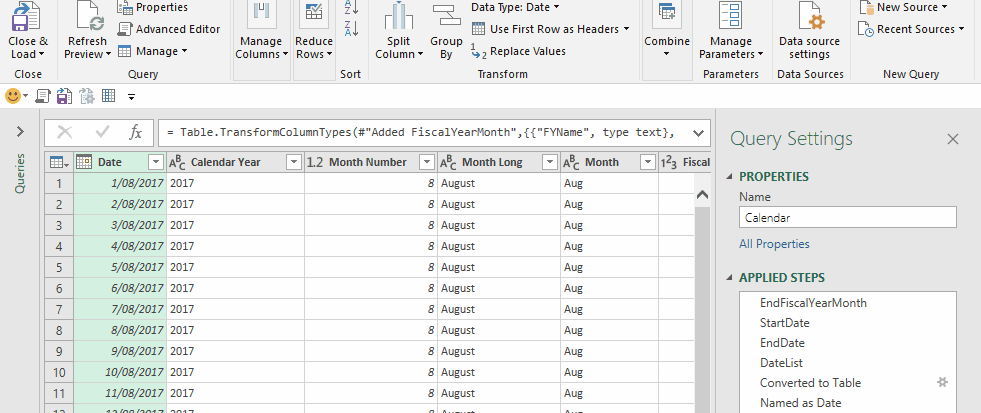
Alternatively, here’s the Power Query “M” code I use for all of my projects to create a calendar automatically. You can create a blank query and copy and paste it into your advanced query editor.
let


    EndFiscalYearMonth = 6,   //set this as the last month number of your fiscal year : June = 6, July =7 etc


    StartDate= #date(2016,7,1),     // Change start date  #date(yyyy,m,d)
    EndDate = #date(2018,6,30),  // Could change to DateTime.LocalNow() if you want to always show up to the current date


/* Comment out the above StartDate and EndDate using // if you want to use a dynamic start and end date based on other query/table
   You will need to change "Sales" and "Invoice Date" in 2 lines below and then remove the //
*/


    //TableName = Sales,
    //DateColumnName = "Invoice Date",
    //StartDate = Record.Field (   Table.Min(TableName,DateColumnName)  ,DateColumnName),
    //EndDate = Record.Field(Table.Max(TableName,DateColumnName),DateColumnName),


    DateList = List.Dates(StartDate, Number.From(EndDate)- Number.From(StartDate)+1 ,#duration(1,0,0,0)),

    #"Converted to Table" = Table.FromList(DateList, Splitter.SplitByNothing(), null, null, ExtraValues.Error),
    #"Named as Date" = Table.RenameColumns(#"Converted to Table",{{"Column1", "Date"}}),
    #"Changed Type" = Table.TransformColumnTypes(#"Named as Date",{{"Date", type date}}),
    #"Inserted Year" = Table.AddColumn(#"Changed Type", "Calendar Year", each Date.Year([Date]), type number),
    #"Inserted Month Number" = Table.AddColumn(#"Inserted Year", "Month Number", each Date.Month([Date]), type number),
    #"Long Month Name" = Table.AddColumn(#"Inserted Month Number", "Month Long", each Date.MonthName([Date]), type text),
    #"Short Month Name" = Table.AddColumn(#"Long Month Name", "Month", each Text.Start([Month Long], 3), type text),
    #"Fiscal Month Number" = Table.AddColumn(#"Short Month Name", "Fiscal Month Number", each if [Month Number] > EndFiscalYearMonth  then [Month Number]-EndFiscalYearMonth  else [Month Number]+EndFiscalYearMonth),
    #"Changed Type1" = Table.TransformColumnTypes(#"Fiscal Month Number",{{"Fiscal Month Number", Int64.Type}}),
    #"Fiscal Year" = Table.AddColumn(#"Changed Type1", "Fiscal Year", each if [Fiscal Month Number] <=EndFiscalYearMonth  then [Calendar Year]+1 else [Calendar Year]),
    #"Changed Years to Text" = Table.TransformColumnTypes(#"Fiscal Year",{{"Fiscal Year", type text}, {"Calendar Year", type text}}),
    FYName = Table.AddColumn(#"Changed Years to Text", "FYName", each "FY"&Text.End([Fiscal Year],2))
in
    FYName
If you’re not familiar with M code then the // is a way of adding comments or “turning off” bits of code
I’ve set it up so that it can be used in a number of ways, but as it stands we have a StartDate of 1st July2016 and an end date of 30 June 2018.
However, you can amend the code to a dynamic End Date using DateTime.LocalNow()
Best to start with the 1st of your current or any prior fiscal year and end with the last day of your current or future fiscal year.
Dynamic Start and End Dates
Maybe you want the Start Date and End date to be dynamically derived from the earliest and latest date in a column in a specific table / tables.
In that case, you add a double slash // before the StartDate and EndDate in rows 2 and 3 then remove the // from the 4 lines below. Then replace the word Sales and Invoice Date with the relevant query (table) name and column name.
//TableName = Sales,
//DateColumnName = "Invoice Date",
//StartDate = Record.Field (   Table.Min(TableName,"DateColumnName")  ,"DateColumnName"),
//EndDate = Record.Field(Table.Max(TableName,"DateColumnName"),"DateColumnName"),
Want to learn more? Follow these useful links
Power Query articles | Power Query books


