
by Melina Louzada
Excel Office Scripts for Effortless Data Movement
Welcome to the world of streamlined efficiency with Excel Office Scripts! In this blog, we dive into the transformative power of automating your Excel workflows, specifically focusing on a scenario many of us encounter: managing and organizing current and completed records in an Excel file.

Picture this…
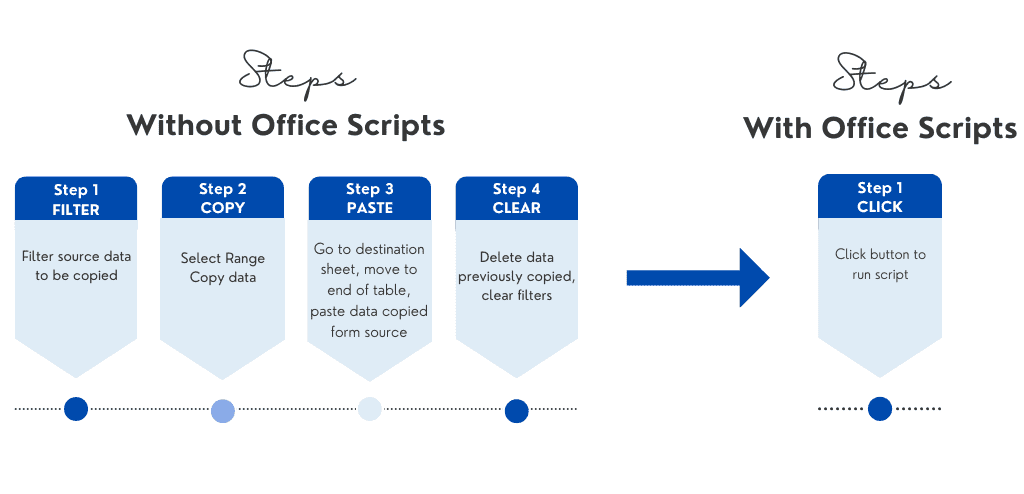
You have a list of Purchase Orders in Excel which lists all the essential records, you then manually change the order status to Fully Supplied, and then filter, cut and paste into another sheet where your Completed Orders are stored, and then return to the Current Orders sheet and clear the filters. It’s a dynamic space where orders come and go, but over time, this list grows longer and more unmanageable. It may not seem like a lot of work, but when you have to do this over and over again, it is not only a very tedious task, but the room for accidental errors also increases.
How do you make this process more efficient and keep it clean, organized, and focused solely on the pending orders? The answer lies in Excel Office Scripts!
About Office Scripts
Office Scripts in Excel is designed to bring the power of automation to your spreadsheets. It’s a platform that allows users to record, write, and run scripts in Excel Desktop and for the web, leveraging JavaScript or TypeScript (TypeScript is a superset of JavaScript, meaning that any valid JavaScript code is also valid TypeScript code). This technology is particularly beneficial for automating repetitive tasks, integrating with other Office services, and streamlining complex workflows. With Office Scripts, users can create scripts that manipulate data, format cells, and even communicate with other Microsoft 365 applications.
Benefits
One of the main benefits of Office Scripts is its ability to save time and reduce errors in data management. By automating tasks that were previously done manually, users can ensure consistency and accuracy in their data handling. It’s particularly useful for businesses and individuals who regularly work with large datasets or complex Excel functions. The integration with Power Automate also opens possibilities for more advanced workflows and automated processes across various Microsoft 365 applications.
Limitations
However, there are some limitations to Office Scripts. Once created, the script is saved to the user OneDrive, therefore, it lives in the organisation tenancy and differently from VBA, it cannot be easily shared with external parties. The script can be shared with users from the same organisation by making it available in the file where the script is to be run, a button can be added to make the process more obvious and easier to access. The script is also available to be used in Power Automate.
Additionally, the scripting requires a basic understanding of JavaScript or TypeScript, which might pose a challenge for users without a programming background, although the “Record Actions” feature can make this learning process a little easier.
It is important to note that the Automate tab (Office Scripts) is only available to certain versions of Excel, typically available for:
• Microsoft 365 Business Plans: This includes Business Premium and higher plans.
• Microsoft 365 Enterprise Plans: Generally available in E3 and E5 plans.
• Educational Plans: Certain educational plans may include access to Office Scripts
It is not yet available in Excel for Microsoft 365 Family or Personal plans.
To find out more about subscriptions click HERE.
*It’s important to note that Microsoft continuously updates and changes its service offerings, so it’s always a good idea to check the latest information from Microsoft’s official resources or your subscription details to confirm the availability of Office Scripts in your specific plan.
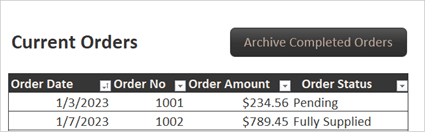
Scenario
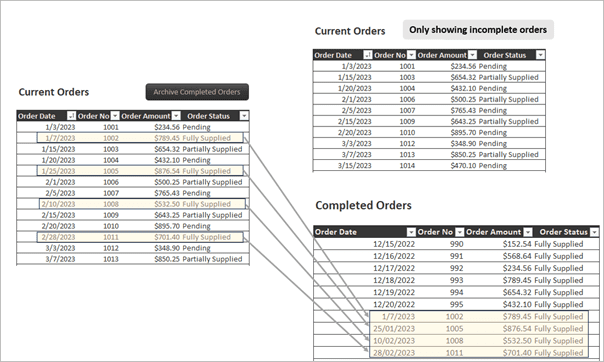
You have a lists of orders and as you fulfill them, you change the order status to Fully Supplied, the list is getting longer and you just want to see the current orders pending action in this list and want to move the completed orders to another sheet for record keeping purposes.
Seeing Office Scripts in action
Click on the download below to view the base file and a copy of the code.
![]()
In the file provided, the original orders data is saved in a separate sheet for backup purposes only.
There are two code options to use, one with and one without sheet protection.
⚠️ It is recommended to keep a copy of the original data when building the code and playing with different scenarios as when the code runs, Excel is unable to undo the actions performed by the script.
Building the code from scratch
If you wish to follow along, open the file “Excel Office Scripts_Start” available for download in the link above. The final version of this file is also available for comparison.
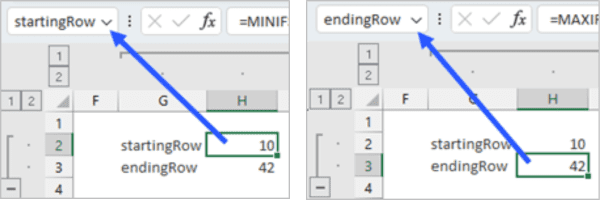
This script uses helper cells to assist with the location of the cells we want to manipulate, it makes the code a lot simpler and easier to understand, so before diving into the details of the script, setup the helper cells as follows:
Type the formulas into the cell locations as per below:
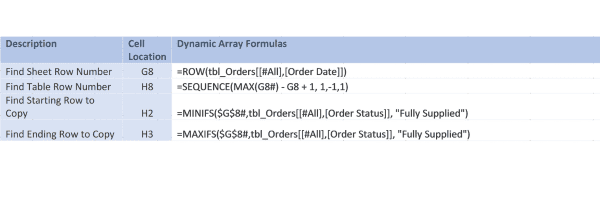
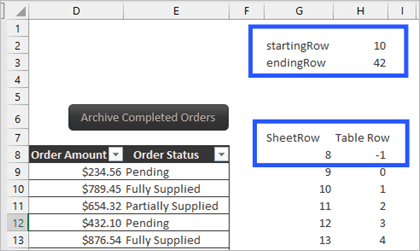
Define a named range for the startingRow value and endingRow values.
Now, to start writing your script, click on the “Automate” tab in your Excel and then on “New Script”.
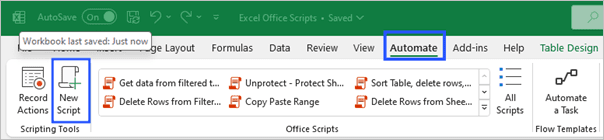
A code editor will open on the side of the screen. Once code is completed, click on save and it will be saved to your OneDrive.
Here you may choose to copy the entire code provided in the download files or follow the instructions and type it directly in the code editor.
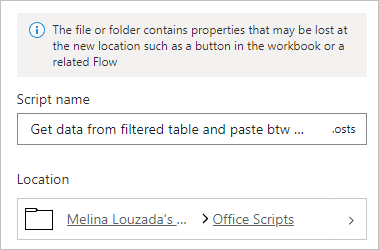
Give your script a name by clicking on “Script”, you can then edit the name and the location where the script will be saved.

The basic fundament of a script is that we need to be very specific in telling the script on where to look for the information we want it to manipulate, then we give instructions on what we want it to do with this information. And it is also important to note that the code is case sensitive.
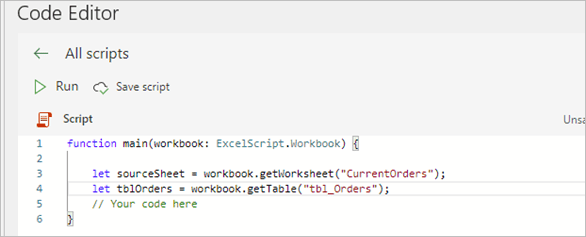
Each script must contain a “main” function with the “ExcelScript.Workbook” type as its first parameter, this already comes pre-populated when creating a new script.

In our first line of code, we are going to use “let” to define variables being used in the code. The entire code is typed between the curly brackets { } after the first function statement.
Here we define a variable named “sourceSheet” which is looking for the sheet named “CurrentOrders” in the file. In the following row, instead of looking for a sheet, we are looking for a table named “tbl_Orders”.
Whilst it is not necessary to add ; at the end of each statement, it is considered a good practice to clearly tell the reader that particular line of the code has ended.
Script: Get Data and Paste to a different sheet in Excel
Now that we have told the code where to look, we need to provide more information. When pointing the code to a cell or a range, we need to use the method “getRange()” and “getValue()” to get the value of the range.
In this example, we are using a named range as it is recommended rather than hard coding a specific cell address (i.e. cell A1) in the code. Hard coding a specific cell is not recommended as the code does not update dynamically if the value of a cell is moved (i.e. other columns / rows added or deleted).
We then sort the table by Order status to have all the Fully Supplied orders grouped. Then using the helper cells, we identify in which row the first and last Fully Supplier orders are located. A named range has been linked to the cell where the formula is (see above)
Note that the code will not run if there are no Fully Supplied Orders, this code could be improved to handle errors and show certain messages depending on outcome of actions performed, to keep it simple, it is not included in this example.
After applying a filter to select only “Fully Supplied” orders, we then copy the visible range to paste into destination sheet.

Now we need to explain what to do with the source data and define location of target sheet.
First, define the destination sheet location, and we are then looking for the last row with values, assuming the column B has values. Note this is not error proof, ideally the sheet would need to be protected to avoid data being entered at the bottom of the completed orders table. We can tweak the code to unprotect and then protect sheet while performing the actions (see below for more info on this option).
Once the last used cell is located, look for the next row and paste values copied from source sheet.
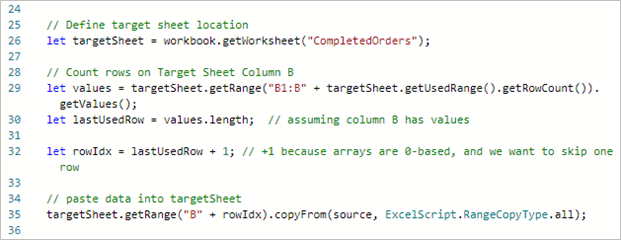
Then, delete the copied items from the original sheet, clear the filters and sort it in Date order (1st column – index 0).
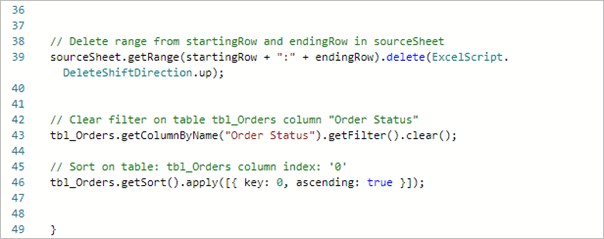
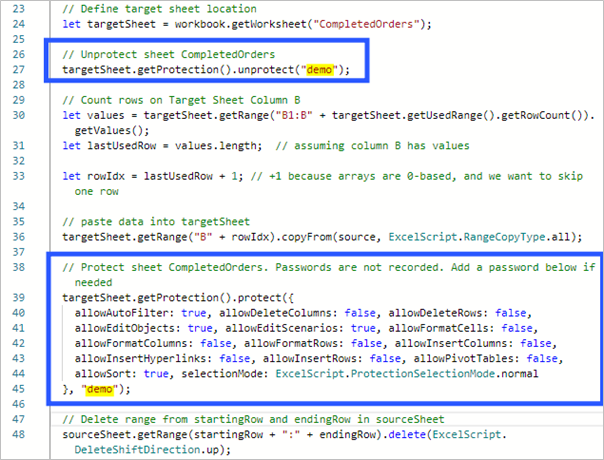
Adding and Removing Protection on Worksheet
Optionally, we can also apply worksheet protection to run in the code. In this case, it is a good idea as it is looking for the last used cell in the CompletedOrders sheet, so to avoid accidental values being entered, it is recommended to protect the sheet.
Add the “Unprotect” part after defining the Target Sheet location step and add the “Protect” part after pasting data into Target Sheet step. The highlighted “demo” can be replaced with the desired password to protect and unprotect the sheet. For no password, use “” .
The code will still run if the Target Sheet has no password.
Add a button to run the script in the file
Office scripts must be triggered to run, one way of doing this inside the file is to add a button. To do this, click on + Add in workbook, in the Script access area inside the Code Editor panel. Note it will add the button directly on the cell you are in.
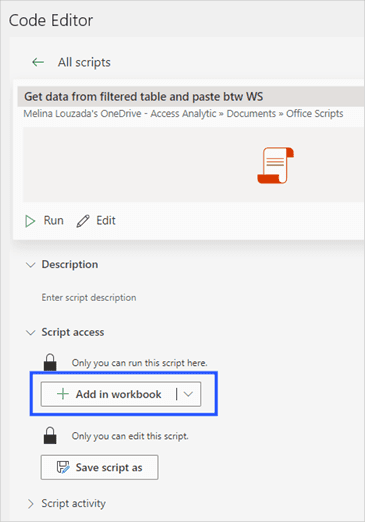
To move the button after it has been added, right click and then drag to move. The button can also be renamed and customised as a regular Shape to suit your sheet style. Right click and then click on Text to rename.
If the code has run successfully, a message will appear above the formula bar.
![]()
Note: that by adding a button to the file, you are automatically sharing the script within people inside your organisation, it is may not be available to external parties, depending on where the file is saved. i.e. if the file is saved in the organisation SharePoint, the script will not be shared with people from outside. Sharing a copy of the script file, which automatically saves on your OneDrive would be a way around this.
Conclusion
Office Scripts in Excel stands out as a powerful tool for enhancing productivity, fostering a more efficient approach to data management, and opening new avenues for automation within the Microsoft 365 suite.
Learn more about Office Scripts HERE.


