
Power Query is an amazing tool for cleaning and transforming your data to make it ready for analysis in Power BI or Excel. Here are 5 useful hints to help you use Power Query more effectively:
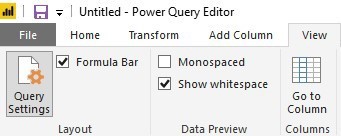
Hint #1 – Use the Formula Bar
The Formula Bar helps you quickly understand which step you have previously referenced, which Power Query formula you are using, and whether certain information has been hard-coded into an applied step.
When you use Power Query for the first time, your Formula Bar may not be switched on by default. Go to the View menu and tick the “Formula Bar” box to make it appear.
Hint #2 – Rename Your Applied Steps
The default names that appear in the “Applied Steps” box often don’t tell the full story about what transformations you have done to the data. An applied steps box full of steps with names such as “Changed Type3”, “Renamed Columns2” and “Removed Other Columns4” can be difficult to understand and debug.
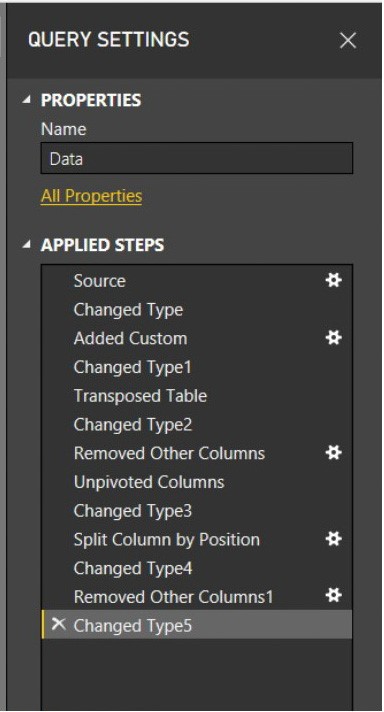
A better practice when performing query transformations is to double click each step and rename it as you go. This not only helps you identify extra steps that can be eliminated, but also tells a clearer story of what you have done to the data to assist you with performing more complex transformations.
Hint #3 – Add Comments in Your Power Query Code
You can add a comment to a line of Power Query code by right-clicking the applied step and selecting “Properties”. Add your comment to the “Description” box and then click OK to save your code. You can then view the code by going into the Advanced Editor.
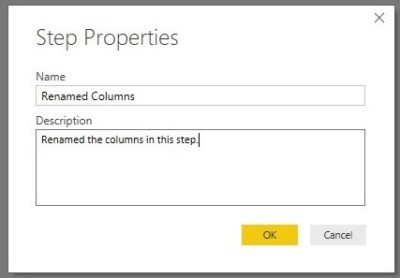
Adding comments to your code is especially helpful when documenting complex transformations you are performing to a dataset, and can help other users understand what you did.
Hint #4 – Remove and/or Combine Steps
Power Query sometimes adds extra steps to your code automatically after creating a new column or splitting an existing column. These steps should be removed when necessary to simplify your code.
For example, when adding a new column, there is no need to have a separate step for creating the column, renaming the column, and then changing the column’s type.
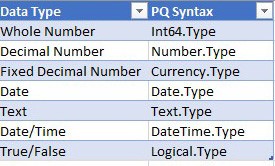
Instead, create the column via “Custom Column” in the Add Column Menu, then edit the resulting code in the formula bar to change the name, calculation and column type. You can add a column type to this step by typing a comma and then the column type syntax before the last parenthesis in the formula bar.
The syntaxes for many common column types are below:
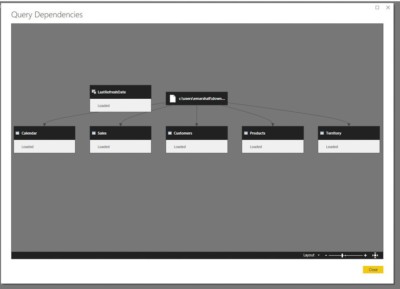
Hint #5 – Check Query Dependencies
To view relationships between your queries, as well as the different data sources that your queries rely on, go to View/Query Dependencies.
This window is very helpful for understanding complex data models featuring multiple queries that reference other queries, or that are merged with or appended to other queries.
Your data is now ready for analysis!
Related Posts:
 Excel Office Scripts for Effortless Data Movement
- How ChatGPT’s Premium Features are Revolutionising…
- Unleash the Power of Cloud-Based Budgeting &…
- Dynamic Data Validation with Tables in Excel
- Streamlining Power Query Code Documentation with GPT-4: A…
- Navigating the New Normal: Why CFOs are embracing Data…


